Times Of Lore
Information, walkthrough, hints, cheats, etc. by David EatonIntroduction
I played this game when I was a young teen. And apparently I had a lot more tenacity for games back then than I do now. I tried re-playing the game recently and found myself constantly being frustrated with things that never bothered me in the slightest when I played the game in grade school.
Games were different back then. According to some accounts on Wikipedia and elsewhere, games of the time that got you into unwinnable situations or made you repeat steps dozens of times were advertised as being positive rather than negative. They increased "re-playability" and made for more hours of gaming "enjoyment". By more modern standards, however, these are considered design flaws. You won't catch too many new games that get you into an unwinnable situation-- they just tell you "you lose" right there and then, rather than make you discover you're stuck some 3 hours after the fact.
But we all dealt with it just fine back then, and being a kid with lots of energy I fought my way through Times Of Lore by hand-drawing maps, figuring out triggers, and just generally doing all the things we consider painstaking today. Can't I just look it up online? What are the cheat codes? Isn't there a hint book I can buy? No, no, and no.
But now, upon re-discovering the game, I'm writing this to hopefully save you some time because without help, I certainly wouldn't have had the patience now to replay this game the way I did the first time. Also, in looking at other walkthroughs online, they just weren't sufficiently detailed, or were rather unclear. They were enough to get me through the game, but they still left me wanting.
So this time when I explored the game, with some years of programming under my belt, as well as a (gasp!) hard drive, I was able to delve into some of the binary code, rather than explore solely within the game engine. That certainly made some things easier. And it gave me some cheats that I exploited in order to more rapidly learn about the game.
Walkthrough
Start by choosing your character. It really makes little difference, since all their statistics are pretty much the same. The only noticeable difference is that the Valkyrie's damage is small initially. So where a Knight or a Barbarian can kill a rogue in 1 hit, or an orc in 2 hits, the Valkyrie takes 2 and 3 hits to kill the same enemies respectively. But everyone is made equally strong upon picking up the axe (which I assume you'll do), so everyone's pretty much equalized.
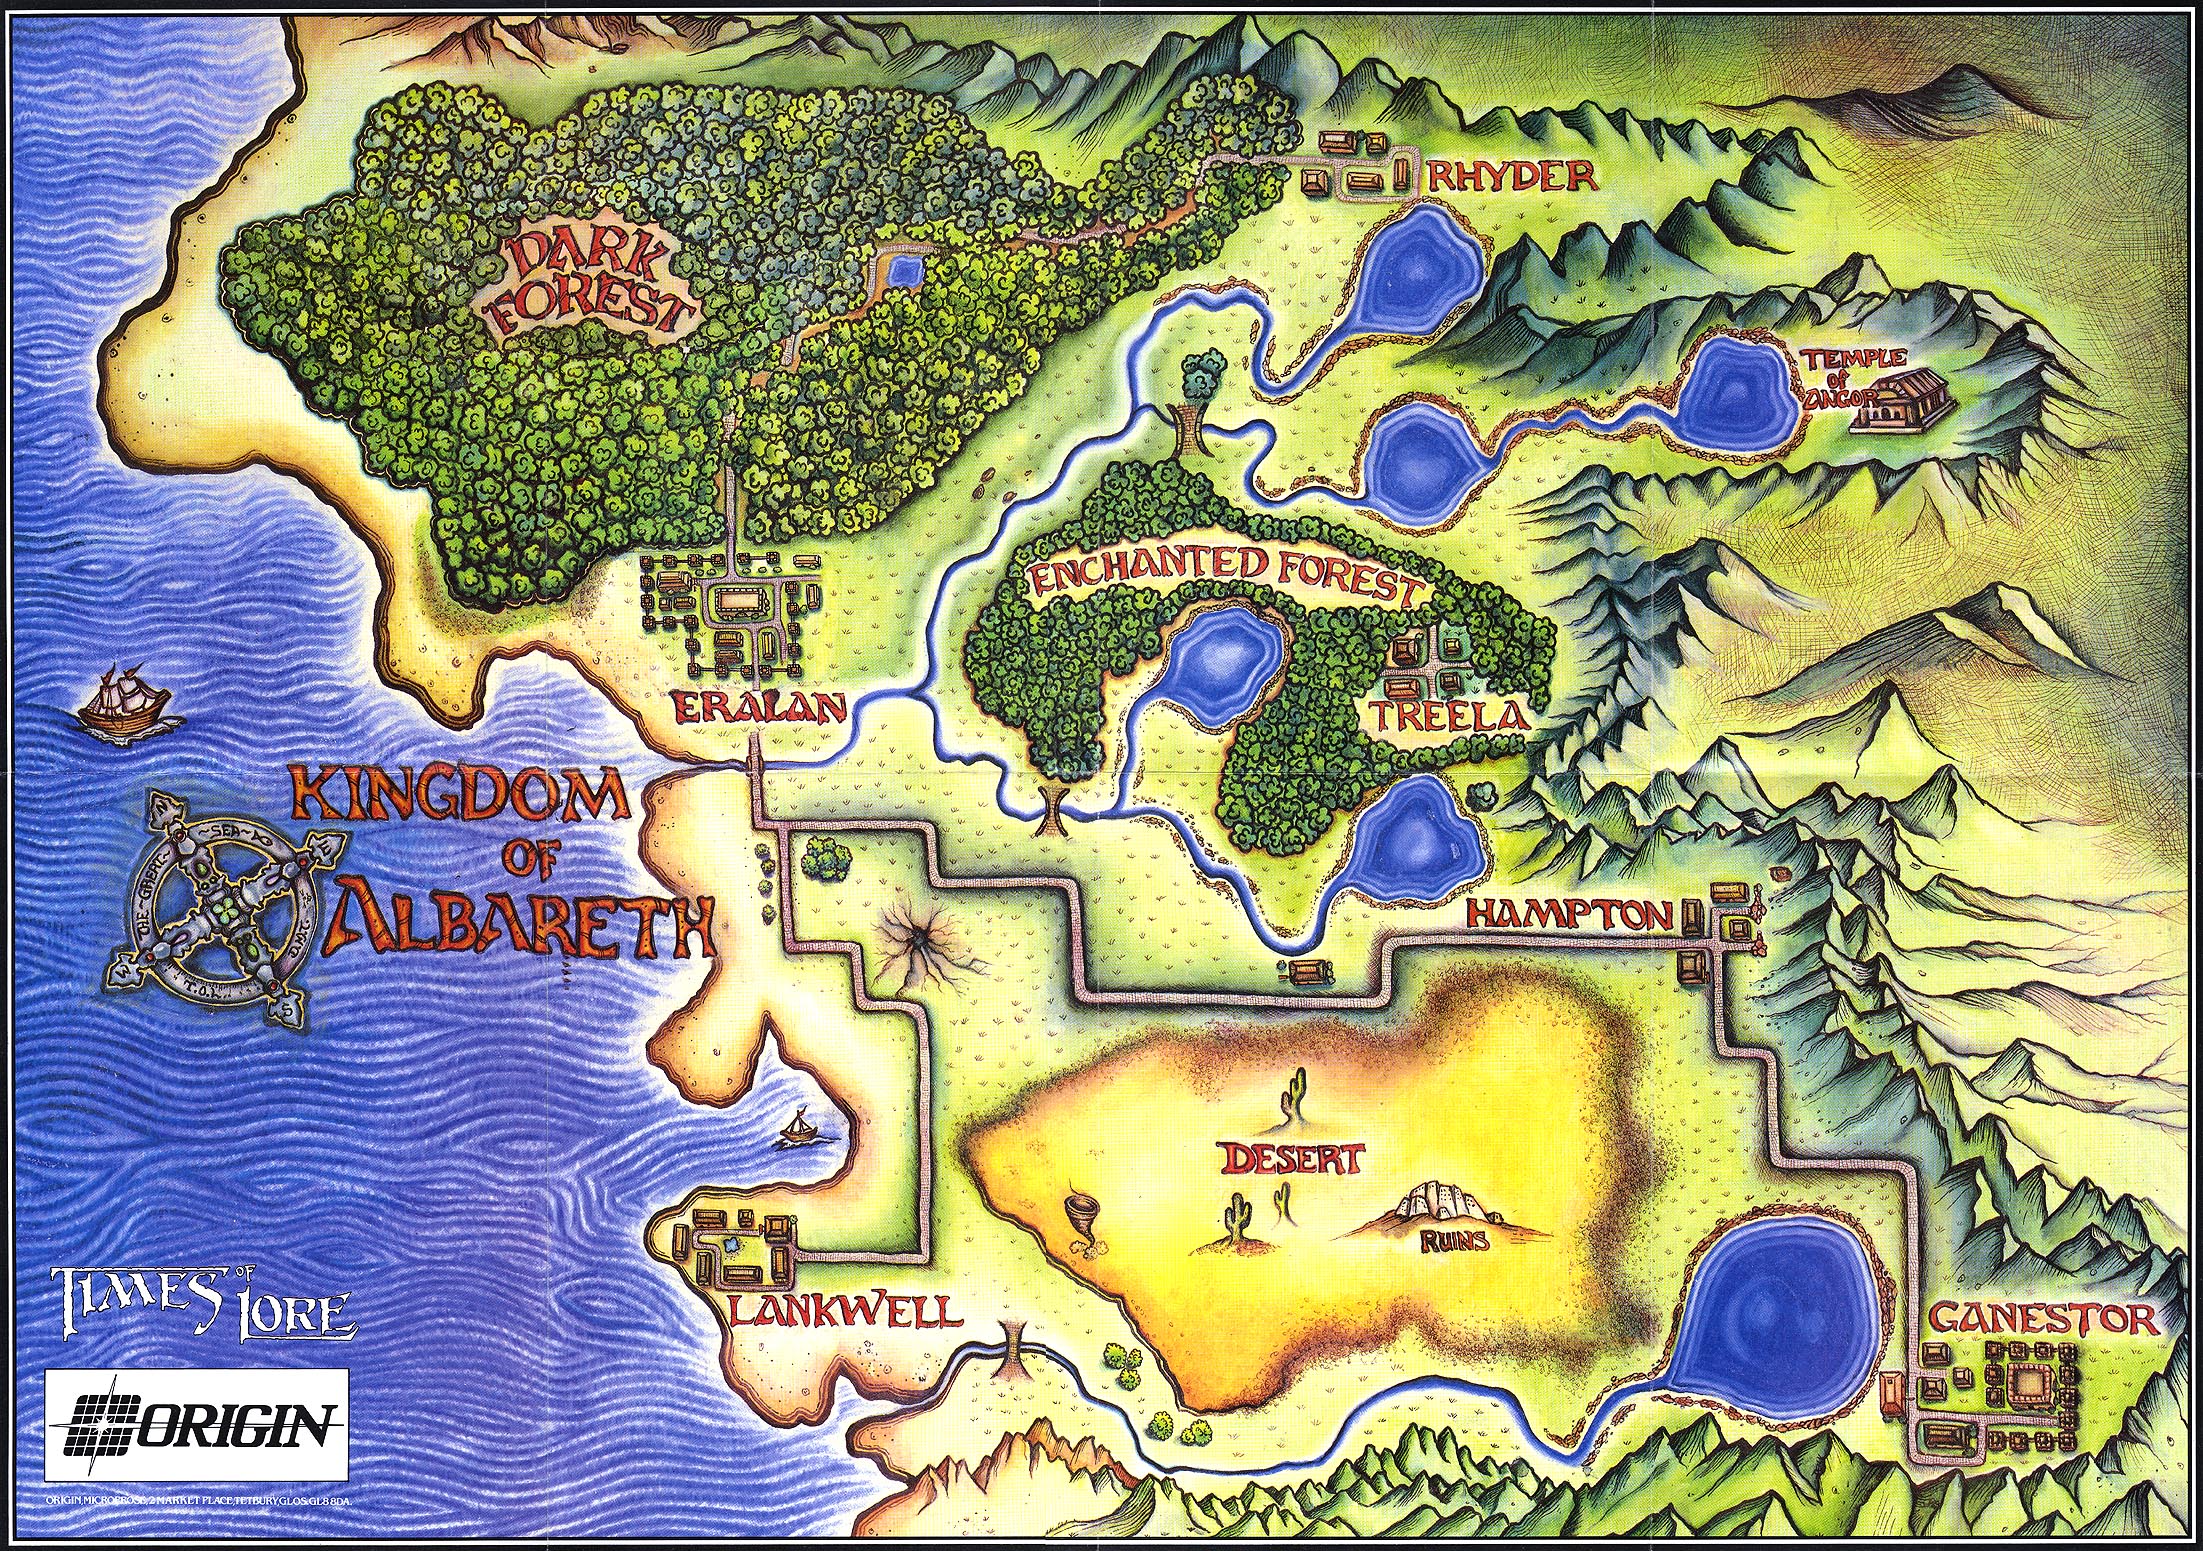
For convenience, here's a map of the game world. I took this (and the map of the two dungeons) from Paul Senzee, who reverse engineered them out of the game engine (mostly-- he did some fudging to make them a bit more legible). I touched them up by adding buildings, paths through the forest, and other annotation, just for completeness's sake. Also, I've added the game map as released with the game, which has some interesting discrepancies when compared with the actual map (taken from World of Spectrum)
Non-Essentials
To make the game easier, you may want to start off with some non-essential things. They won't further your quests, but you'll have a much easier time doing the real quests if you get these items first-- particularly the axe. I'd recommend fitting these in when convenient as you go through the walkthrough.
1. The Axe
Now and again you'll hear about "a magical axe" in Lankwell. It's pretty much a must-have for adventuring, since it allows you to attack enemies at long distance, and it returns to you (unlike the dagger, which you always have to pick up after throwing). So take a trip down to Lankwell. There's 7 buildings there, and the man in the northwest-most house will sell you the axe. It'll cost you 95 gold, but that shouldn't be a problem for you.
2. The Boots
The magical boots are nice, but aren't anything amazing. You have to use them repeatedly in order for them to function, which usually means that every morning you should "use boots" again. But they'll help speed you up relative to your opponents, and when you run with them, it'll be easier to leave opponents behind. To get them, you'll have to go to Treela. The serf that will sell you the boots lives in the south-western house, although he also walks around town and hangs out in the inn as well. He'll only ask you about the boots ONCE, though, so be sure to reply "Yes" about them when he asks, and then buy them for 77 gold.
3. The Dragon / Circlet
In the northern border, there's a dragon living in the mountains. Or, more appropriately, there's a cave with a dragon's head sticking out. If you can manage to kill the dragon, he'll drop 'the circlet' on the ground. It's a magic ring that you can use once, and will turn you invisible for a minute or so. This is a very handy feature for certain parts of the game, but since you can only use it once, use it with caution.
NOTE: In the Apple II version, there is no dragon. Instead, the ring is kept by a "giant" living to the right hand side of Rhyder. The giant has the same image as a standard orc, but it takes many more hits to kill.
The Essential Quests
These actually aren't all necessary to complete, but are the general flow of the game. They're what's "expected" of you, despite the fact that there are some you don't actually need to accomplish in order to progress.
A. Fortelling Stones
You'll start the game off in Eralan, upstairs in the inn. When you head downstairs, you may hear about the 'raiders of the forest' from the the Innkeeper. No biggie if you don't. You'll also meet a prior who will ask you a favor. Be sure to answer "yes"! Turns out, the Fortelling Stones (one of the 3 kingly artifacts in the story arc) were stolen by a band of orcs-- the aforementioned 'raiders of the forest' that you may or may not have heard about. You're going to need to return the stones to the prior.
Head north of Eralan into the Dark Forest. Follow the path through the forest until you hit a small woodsman's cottage. If you talk to the woodsman who lives there, he'll tell you how to find the orcs' camp, which is further down the forest path. Keep walking down the path, and you'll see a small pond. Directly north of the pond is an entry point into the thick of the forest. Follow the winding path, and you'll come to a clearing, which has the orc camp. Kill the orcs, and their chief will drop an urn containing the Fortelling Stones. Get the urn, and make your way back to Eralan. Once you give the urn to the prior, he'll give you 149 gold as a reward (it may be randomized-- I got 149 on two successive runs) and tell you about the next quest.
B. Tablet of Truth
The prior tells you that the Regent needs your help. This will allow you entry into the Regent Dariel's castle in the center of Eralan. And while you're allowed to explore the castle's ground floor and roof, the basement is restricted. Any guards that catch you there will force you outside. Head on into the castle and find the Regent on the ground floor. He'll tell you that he wants you to take the Tablet of Truth (the 2nd kingly artifact) from the southern warden, Heidric.
It's a long journey to Ganestor, but you'll have to walk it (unless you're cheating or skipping ahead!) Since it's a long trip, this may be a good opportunity to take a side trip to get the axe from Lankwell or the boots from Treela. When you finally arrive in Ganestor, talking to people around town will tell you two things. First, that there's a guard who's been sneaking around late at night, and second that there's a secret way into the Warden's castle underneath the town's inn. And it's not hard to guess which is relevant! The secret entrance to the castle is in the basement of the inn-- you'll have to bump into the lever in order to open the secret stairwell.
The stairs will lead you into the upper-left corner of the basement of the Warden's castle. This can get tricky, so you'll want to save your game immediately before trying. There are guards who wander around the various levels of the Warden's castle. If they catch you, they'll imprison you and you'll die in your cell. So you'll have to sneak around to the stairs while avoiding the guards, and take the stairs up to the ground floor of the castle. Make your way around to the storage room containing the Tablet, and pick it up. Now get out safely! You can either use the main door on the ground floor, or go back down the way you came.
You'll notice that when you picked up the Tablet, it spoke to you. In fact, it told you to ask about a matter of great importance. So go ahead and ask before giving the Tablet to the Regent! Ask the Tablet about the High King, and you'll get the answer that you should seek the king's assassin in Lankwell. You don't need to know that to complete this quest, though. All that remains for this one is to return to Eralan (ugh!) and give the Tablet to the Regent. He'll give you 153 gold as payment (Again, may be randomized).
Truth be told, though, you don't have to complete this quest at all. You can simply keep the Tablet and NOT give it to the Regent-- it won't make any difference other than the fact that you'll get a payment, and won't have the Tablet filling an inventory slot.
C. Assassin
The Tablet having told you to seek the assassin in Lankwell, that's your next destination. Find the thug (usually at Lankwell's inn), and ask him about the assassin. He'll tell you that there was an assassin called the "Black Asp" who lived nearby. Next, ask the serf in the west-most house about the Black Asp, and he'll tell you that he lives a short ways south from Lankwell, across the bridge.
Following the directions to the Black Asp's house, sure enough, you'll find him inside. Ask him about the "High King", and he'll tell you his story of how he was hired by the Regent Dariel to kill the king without knowing his identity. He'll write you a confession ("the scroll"), which he asks you to deliver to the Warden in Ganestor.
Again, you'll have to go back to Ganestor and use the secret tunnel into the Warden's castle. This time, head up to the top floor (still avoiding those pesky guards), and give him the scroll. He'll read it and unfold the plot further. But on a brighter note, you'll now have free reign to walk around the Warden's castle.
D. The Spy
The Warden will tell you that someone has been spying on him, and can't make any moves against the Regent until the spy is caught. Remember how you heard that someone was sneaking around late at night? Now that tip pays off.
Wait until nightfall, and you'll see one of the guards trying to leave the castle (or wait outside for him). He's the stationary guard on the ground floor, just inside the castle to the right. Once you see him moving around (at nightfall), ask him about spying, and he'll realize his cover is blown and attack you. Kill him, and pick up the note he was carrying. It's proof that you can deliver to the Warden that you've caught the spy.
E. Kidnapped Prince
After giving the note to the Warden, he will tell you that his son, the prince, has been kidnapped near Hampton! (Why the son of a warden is a prince I can't fathom. Also, getting his son back ought to have nothing to do with moving against Dariel, but that's the way the cookie crumbles.) Head over to Hampton, and talk to the Duke in the northmost house. He'll tell you that his servant saw the kidnappers somewhere by Shadow Peak. Turns out that's a useless bit of information, since there's no "Shadow Peak" on the map. You're just expected to explore the mountains nearby.
Fortunately, their hideout isn't far away. Head east from Hampton along the mountains, and you'll find the kidnappers' hideout. There are two guards to kill (one on each floor), one of whom will give you a green key. Also, you'll notice the green scroll on a table downstairs. Be sure to take the scroll-- you can use it (maximum of 3 times) to transport you to any town in the kingdom. Very handy. Head upstairs, and find the prince. With the green key, you can open the door and free him.
He'll of course tell you that you should do something entirely different with your time. He says that you should go to see the Wizard Irial, who lives in the tower over a bridge north of the Enchanted Forest.
F. Ruins
Find Irial at the top of the Wizard's Tower, north of the Enchanted Forest. He will ask you to prove your worth by defeating the Lyche who has taken up residence in the desert ruins.
Head over the the Last Hope Inn, north of the desert. There, you can talk to one of the patrons who will tell you that the only way to kill the Lyche is with holy water-- only available from Friar Kaine of Rhyder. So you'll need to go to Rhyder, buy some holy water from the friar for 25 gold, and then return to the Last Hope Inn (the best place to save your game before proceeding into the ruins). Now you're ready to proceed down into the ruins, directly below the inn.
This is where it gets really annoying. Up until now, if your health was low, you could try and kill monsters in the hopes that they'd drop a blue or green potion for you. Well, not in the ruins dungeon. In the dungeon, the only monsters you'll come across are wraiths, skeletons, and slimes, none of which will drop anything. Also, if you were thinking you were going to stop in a safe corner and heal slowly, remember that you can only carry a maximum of 9 food, which may run out, forcing you back to the surface. As a result, speed is vital.
The dungeon has a series of "brick switches" on the ground that will open doors, remove portions of walls, and teleport you elsewhere within the dungeon. Also, they can close off passages as well, so be careful. If you leave the dungeon, you can refill your stash of potions and scrolls that you may have used, but you take a risk that the dungeon will reset. According to other things I've read, the dungeon will reset itself sometime during the night, unless you're inside it. If you're inside, it'll only change when you press switches.
The map I've drawn out should help you through, although it will probably take a few attempts. Once you reach the Lyche, use your holy water on him, and he'll die-- leaving behind a red potion (which I still haven't found a use for). Make your way out of the dungeon, and return to Irial.
G. Blasted Spot
Before you talk to Irial, check your inventory. If you're holding 9 items or more, drop something-- you'll need a free slot in your inventory. Irial will now tell you that you need to retrieve a chime in order to enter the Temple of Angor (the final quest!). He'll give you a key to the Blasted Spot, where the chime is located.
And now, as if your last foray into the Ruins wasn't enough for you (it was for me!), you get to do pretty much the same thing all over again, except this time with a bit more zig-zagging around.
There isn't a final fight here, though. Just a stand with the chime on it, patiently waiting for you at the end of the dungeon. Once you've battled through it all and gotten the chime, you'll be ready for your final quest.
H. Medallion
The Temple of Agnor is your final destination, housing the Medallion (the 3rd and last kingly item in the game). Sadly, the temple is probably the furthest away from a good save point of all the dungeons so far. As you get close to it, you'll start encountering acolytes who will attack you.
When you enter the ground floor of the temple, you'll notice that skeletons are able to materialize from the floor-- in fact, they seem to do so rather obnoxiously often in my experience, which makes things all the more tricky. This is a good place to use the circlet if you haven't already used it.
Head upstairs, and kill the blue acolyte there in order to get the white key. Then head downstairs, and into the small apparently dead-end chamber along the left-hand wall of the Temple's ground floor. There's a switch in the back of the chamber, which when bumped, will reveal a stairwell to the basement. Go to the basement, and then over to the prison cells, which you can now unlock with the white key.
Inside the right-hand cell, there's a prisoner whose door you want to unlock. When you talk to him (be sure to reply that "yes", you'd like to kill the Grey Abbot), he will tell you that you'll need the sphere which is kept on the top floor of the temple, under the Abbot's bed. So go back up to the top floor, and around to the bed. Use the "look" command when you get to the bed, and the sphere will appear mysteriously. Pick it up and head down to face the Abbot.
The Abbot is sitting on a throne on the ground floor. If you stay in front of him long enough, he'll cast a spell on you that will kill you. So try to be quick! Use the sphere on him, and he'll be killed, leaving behind the Medallion.
Pick up the Medallion, and you've won!
Quickest Game Possible
As stated earlier, you can skip ahead if you know how. For the fastest win possible, with no cheating:1) Go to Rhyder, kill the Friar, take the holy water.
2) Go to the Ruins, kill the Lyche.
3) Visit Irial, get the key to the Blasted Spot.
4) Get the chime from the Blasted Spot.
5) Go to the Temple, head directly upstairs, get the sphere.
6) Kill the Grey Abbot with the sphere, pick up the medallion.
And as a side note, you can (in theory) finish the game with only 33610 points if you manage not to kill ANYTHING along the way (including the Friar, which means going to the Last Hope Inn to be able to ask the friar for the holy water, rather than killing him, which earns you points). Of course, in practice, this is pretty much impossible without cheating, since you'd be hard pressed to never kill any other NPC's.
Item Guide
Don't you love how all the items in the game are called "the _____"? Regardless of whether an item is unique or not, it's prefaced with "the", which is (I think) due to the way the game is programmed. Other than the bag of gold, there should only ever be at most 1 of any item in existence at any given time (unless you cheat). Gold is special, and can have as many as two on the ground, because internally, it keeps track of two bags separately, as if they were 'bag 1' and 'bag 2'.
| Item | ID | Location | Function | |
|---|---|---|---|---|
 |
the white key | 00 | Dropped by one of the acolytes in the Temple of Angor | Unlocks the prisoner at the bottom of the Temple of Angor |
 |
the note | 01 | Dropped by the spying guard in Ganestor (or the Warden's castle) | None (Quest item) |
 |
the Tablet | 02 | On the floor of the Warden's castle in Ganestor | Can be asked questions, should be asked about the "High King" |
 |
the circlet | 03 | Dropped by the dragon (or by the giant in Apple II version) | Will turn you invisible for a few minutes, usable once |
 |
the urn | 04 | Dropped by the orc chieftan by the orc camp in the Dark Forest | None (Quest item) |
 |
the key | 05 | Given to you by the wizard Irial after solving the Ruins | Allows entry into the Blasted Spot |
 |
the boots | 06 | Purchased from a serf in Treela | Makes your character run faster (requires you to "use" the boots) |
 |
the chime | 07 | On a pedestal in the Blasted Spot | Allows entry into the Temple of Angor |
 |
the medallion | 08 | Dropped by the Grey Abbott in the Temple of Angor | None (Quest Item-- wins you the game!) |
 |
the holy water | 09 | Purchased from the friar in Rhyder | Can be used to kill the Lyche in the Ruins |
 |
the sphere | 0A | By "looking" at the bed on the top floor of the Temple of Angor | Can be used to kill the Grey Abbot. The trick with the sphere magically appearing is that it actually just changes the image used to display it. Initially, the sphere uses an image that makes it look like part of the bed it's on, so you can also simply try to pick it up without "looking", and it'll be there just the same. |
|
the scroll | 0B | Given to you by the Black Asp | None (Quest Item) |
 |
the green key | 0C | Dropped by a guard in the kidnappers' hideout by Shadow Peak | Opens the prince's cell in the top floor of the hideout |
 |
the green potion | 0D | Dropped by various NPC's when killed | Heals you completely (useable once) |
 |
the blue potion | 0E | Dropped by various NPC's when killed | Heals you partially (usable once) |
 |
the blue scroll | 0F | Dropped by various NPC's when killed | Freezes all regular monsters on the screen (usable once) |
 |
the red scroll | 10 | Dropped by various NPC's when killed | Kills all regular monsters on the screen (usable once) |
 |
the bag of gold | 11,12 | Dropped by various NPC's when killed | Increases your gold count randomly by 6-9 gold when picked up. |
 |
the food | 13 | Dropped by various NPC's when killed | Increases your food count by 1 when picked up (max of 9) |
 |
the dagger | 14 | On the floor of the woodsman's cottage in the Dark Forest | Can be used to kill enemies at long distance. Useable once, then must be picked up after each use |
 |
the axe | 15 | Purchased from a serf in Lankwell | Can be used to kill enemies at long distance, will return when thrown |
 |
the green scroll | 16 | On the table in the kidnappers' hideout near Shadow Peak | Will transport you to a city center of your choosing (usable 3 times) |
 |
the red potion | 17 | Dropped by the Lyche when killed in the Ruins | Unknown |
NPC Guide
There are a lot of NPC's, some of whom are repeated name-wise in different locations. Unlike items, which can only appear once per item, NPC's can appear in multiples, and some are unique. The ID shown below is the ID of their name in the text array of names-- it's not necessarily the actual ID of the NPC.
Some NPC's move around and are thus difficult to find. Many unique NPC's that look like standard serfs will actually start the day off at home (getting out of bed at about midday), and at some point wander over to the inn, staying there for a while before heading home for the night. This can make it difficult to find particular NPC's, since they don't stay put. But if you check the inn and the local houses, you'll usually find who you're looking for.
| Name | ID | Location | Points | Description | |
|---|---|---|---|---|---|
 |
woodsman | 2F | Cottage in the Dark Forest | 0 | Tells you about "orcs" and "the camp" for the 1st quest. |
 |
guard | 30 | Regent's Castle, Warden's Castle, Shadow Peak | 400 | Guards either stand still (and won't approach you), or will move around (in which
case they'll do something bad to you). Moving guards in the Regent's castle will simply
throw you out of the castle, whereas moving guards in the Warden's castle will throw you
in a prison cell where you die (except for the syping guard who will attack you after
asked about "spying"). Guards at Shadow Peak will just attack you as normal. Killing a guard at the Regent's or the Warden's castle will result in the townspeople attacking you, with the exception of the spying guard, assuming that you've turned him hostile by asking him about spying. You can freeze guards with the blue scroll without incurring the wrath of the townspeople. |
 |
prisoner | 31 | Under the Regent's Castle, under the Temple of Angor | 0 | The prisoner under the Temple of Angor will tell you where to get the sphere used to kill the Grey Abbot. The one under the Regent's castle is inaccessible unless you cheat, and then isn't really worth talking to. He'll chitchat with you, but tell you nothing of interest. |
 |
serf | 32 | Towns everywhere | 0 | Serfs come in a few varieties, and are mostly just there for ambiance. If you kill an otherwise harmless member of the town you're in, all the serfs in the town will start attacking you on sight. Some serfs are special, and have designated houses and quest items, such as the serf who sells you the boots in Treela, or the one who tells you about the Black Asp in Lankwell. |
 |
Prior | 33 | On the ground floor of the Eralan inn | 300 | The prior will give you the quest to retrieve the Foretelling Stones, and give you 149 gold for completing the task. |
 |
old man | 34 | A few towns, Last Hope Inn | 0 | There are a few "old man" NPC's around. Most of them will tell you the same thing, which allows you to ask about the High King. Hopefully by the time you need to actually ask this question to someone, you've talked to a few old men. Also, the old man at the Last Hope Inn will clue you in to "the temple" and "the holy water". |
 |
innkeeper | 35 | Inns everywhere | NA | For every inn, there's an innkeeper. Each one is pretty much the same, although the innkeepers at Eralan and Ganestor will tell you about some non-essential 'ask' items. If you have enough gold (10), you have the option to buy provisions (1 food) from them, or ask for lodging (also 10 gold). Lodging will always put you to sleep in the inn's bed until midday the following day, and you will be fully restored. Innkeepers cannot be killed, and will similarly not attack you or begrudge you any killing you've done against other townspeople. |
 |
advisor | 36 | Two-Storey house in Eralan | 0 | The advisor is a pretty purposeless NPC. He is seemingly unreferenced by anyone else, doesn't answer any questions, and doesn't give you any new questions. Why the designers decided to include him is apparently a mystery. |
 |
Regent | 37 | Eralan's Castle (Ground floor) | NA | The Regent (Dariel) will give you your second quest to steal the Tablet of Truth, giving you 153 gold for completing the task. But he won't get you anywhere else other than that. You can attack him if you'd like, but you can't kill him, and he doesn't care if you try. |
 |
Chieftain | 38 | Orc Camp in the Dark Forest | 300 | The orc chieftain is a distinctive gray color. He carries the urn with the Foretelling Stones, which he'll drop when you kill him. |
 |
rogue | 39 | Almost Everywhere | 200 | Rogues are a dime-a-dozen. Along with orcs, they're the most common NPC's in the game, and will attack you on sight. They have a ranged attack, and take the fewest hits to kill (usually just 1 hit). They'll randomly drop bags of gold, green or blue potions, food, or red or blue scrolls. |
 |
orc | 3A | Almost Everywhere | 300 | Orcs (along with rogues) are the most common NPC's. They'll also attack on sight, but they can only attack you up close. They take a little more to kill (usually 2 hits). They randomly drop bags of gold, green or blue potions, food, or red or blue scrolls. |
 |
Warden | 3B | Castle in Ganestor, Top Floor | NA | The Warden (Heidric) sits on the top floor of the castle in Ganestor. He won't talk to you until you present him with "the scroll" (the Black Asp's confession). When he does talk to you, he'll grant you two quests-- first the one to find the spy, and when you've dont that, he'll grant you the quest to rescue the Prince. Again, you can't kill him, and there aren't any repercussions for trying. |
 |
Assassin | 3C | Small house southeast of Lankwell | 0 | The assassin is sometimes known as the "Black Asp", but funnily enough, if you ask him about "The Black Asp", he'll say he doesn't know anything useful about that. He will tell you something useful about the "High King", however. He'll give you a confession scroll, (which he'll also drop if killed), intended for the Warden, Heidric. |
 |
hunter | 3D | Small cottage south of Enchanted Forest | 0 | The hunter's sole purpose in the game appears to be to tell you about the location of the wizard's tower. He'll tell you he's seen some strange lights from the north, but that's really about it. |
 |
Duke | 3E | The north-most house in Hampton | 0 | The Duke is a normal serf for the most part, but if you've gotten the quest from the Warden to find the Prince, the Duke will tell you about "the crime", and where to find the kidnapped prince. |
 |
Lyche | 3F | Ruins | 12800 | The Lyche sits in the Ruins under the desert, and must be killed as a test of worthiness for the wizard Irial. Unfortunately, he can't be killed by normal means, only by killing with holy water, which you can get from Friar Kaine in Rhyder. If you wait too long in front of the Lyche, he'll kill you pretty quickly, but he's nice enough to give you some time to get out your holy water. |
 |
Prince | 40 | Top floor of Shadow Peak | 0 | Once you get Warden's quest to find the Pricnce, the Prince will appear. He's been kidnapped and is in the stronghold by Shadow Peak, east of Hampton. You can only get to him if you've gotten the green key from the guard on the ground floor of the stronghold. The Prince (once freed) will tell you to seek the wizard Irial for your next quest. |
 |
skeleton | 41 | Almost everywhere | 400 | Skeletons begin appearing after a certain point in the game as regular monsters (pretty early, actually). This may be triggered by score or by quest completion, but they don't appear initially. They usually take 2 hits to kill, will attack you at long range, and they never drop anything. |
 |
wraith | 42 | Almost everywhere | 500 | Like skeletons, wraiths only start showing up after you've reached a certain point (appearing after skeletons become commonplace). They take more hits to kill (though it seems inconsistent-- about 4 or 5), can only attack at short range, and won't ever drop anything. |
 |
slime | 43 | Ruins, Blasted Spot | 0 | Slimes are quite annoying, but also somewhat harmless. They sacrifice themselves to attack you (at close range) and don't do all that much damage. So once they hit you once, they disappear. Unfortunately, they don't give you any points for killing them, and they also never drop anything. |
 |
cleric | 44 | Temple of Angor, ground floor | 12800 | The cleric is actually the Grey Abbot, but apparently the designers didn't keep the NPC name in line with the story. Shows how important the story was to them, I guess. He's in the Temple of Angor on the ground floor, sitting in his throne. You can't kill him by attacking him, although he WILL talk to you (unlike most other unfriendly NPC's). If you wait too long in front of him, he'll kill you with a spell-- you can kill him first if you use the sphere, and then he'll drop the Medallion. |
 |
acolyte | 45 | Temple of Angor | 300 | The acolytes are from the order of the Grey Abbot. There are a few of them scattered around the Temple of Angor, but not many. The dark blue one (upstairs) will drop the white key when killed. They attack at close range only, and don't drop anything interesting (besides the white key). |
 |
friar | 46 | Northwest most house in Rhyder | 300 | The Friar (Friar Kaine) is the source of the holy water. If you ask him about it, he'll sell it to you for 25 gold. You can also kill him for it, but the townspeople won't take to kindly to you killing their friar (even though you're rewarded with 300 points for doing so). |
 |
Irial | 47 | Wizard's Tower | NA | The wizard Irial won't talk to you until you've completed the Warden's quests. After you've rescued the prince, Irial will talk to you, giving you the quest to kill the Lyche, and the two-part quest to get the chime and kill the Grey Abbot. Irial's another unkillable NPC that just sits on his chair without retaliating if you attack him. |
 |
thug | 48 | Lankwell | ? | The thug (who seemingly has the two-storey house in Lankwell) is yet another serf, whose function is to tell you about the Assassin. He'll tell you that he was known as the Black Asp, but otherwise, he's pretty forgettable. |
 |
Lord Dunbar | 49 | Wide house north of Ganestor inn | ? | Lord Dunbar is only there to throw you off. The Warden suspects him of spying, which is false, and otherwise Lord Dunbar is no different than your typical serf for the purposes of the game. |
 |
dragon | 4A | Northern Mountains | 500 | You may hear rumors of the dragon, which you can hunt down fairly easily if you know where to look. The dragon is immobile (its head just sticks out of the cave), but it's difficult to kill since you apparently can't attack at long range with the axe. It takes a lot of hits, and will breathe fire on you doing quite a bit of damage. But fortunately, it won't chase you if you decide to step off to the side to recover. After killing it, it will drop the circlet on the ground (very helpful indeed!) and often one or two bags of gold. (Note: the dragon does not appear in the Apple II version) |
Snopes of Lore
Claim: I hear there's a dragon near the northern mountains.
Status: True.
There is indeed a dragon living in a cave in the northern mountains. (Unless you're in the Apple II version)
Claim: A dark fog is forming in the northeast.
Status: Unconfirmed.
Claim: A wild dust storm ran through the desert the other day.
Status: Unconfirmed.
Claim: A sorcery tower lies over a bridge north of the desert.
Status: True.
This is a little misleading, since it's more appropriately north of the Enchanted Forest rather than the desert, but nonetheless, the wizard Irial's tower is there.
Claim: I've heard tell of magical boots in Treela.
Status: True.
Claim: A great giant is reputed to live east of Rhyder.
Status: False.
In the PC version of the game, there is no giant. However, in the Apple II version, a giant does indeed live to the right of Rhyder ("East" on the drawn map is actually to the right and slightly north).
Claim: A man from Lankwell boasted he knew about a magical axe.
Status: True.
Claim: People say that there is a magical scroll with the power to transport you around the kingdom.
Status: True.
This is a bit misleading, but mostly accurate. The scroll will transport you to the town of your choosing, not simply wherever you wish.
Cheats
Cheating in Times of Lore is tricky, because there aren't any in-game cheats. You have to do some manipulating of the game files in order to cheat. There are a few versions of the game out there, so this may only be applicable to the version I've used, which was a Windows executable "LORE.EXE" along with a lot of additional data files. So only bother with this section if you're using a compatible version. You'll also want a binary file editor.
1. Gold
Bytes 0x015C and 0x015D in the SAVED.GAM file are the bytes for gold. 0x015C is the low byte (0-255), and 0x015D is the high byte (256-32512). Be sure not to set the high byte to "FF" since it's signed, or else strange things may happen. Just set it to 7F and you'll be good. Not that you need more than about 300 or so gold to complete the game!
2. Food
Food is at byte 0x0162 of SAVED.GAM. In-game you can only get as much as 9 food before it complains at you that you have too much. But by cheating, you can give yourself a full 255 food, and it'll work just fine (you just can't buy or pick up more in game). That's handy if you plan on doing a lot of resting in dungeons and need more than the maximum 9 food. Of course, cheating by giving yourself more food and not via some other method is kinda silly. If you're going to cheat, you might as well cheat for real and do something more advanced.
3. Inventory
Your inventory is also in SAVED.GAM. It starts at byte 0x000D, and has 1 byte for each item in your inventory, up to 0x0016. See the item key above for a table of which byte codes relate to which items.
In addition, byte 0x0017 dictates *how many* things you have in your inventory. The in game maximum is again 9 (this is kind of silly, considering they give you a 10th space), but you can give yourself the 10th thing and it works ok. Except if you want to pick up anything else, you'll need to drop *two* things instead of just 1. And yes, you can give yourself 11 things or more, making other bytes be read in as though they were inventory items, but that's pretty hacky territory.
4. Your "Ask List"
The list of which things you can ask questions about is stored in a similar manner to your inventory, again in SAVED.GAM. It starts at byte 0x0001, ends at 0x000A, and 0x000B controls how many things are in your ask list.
Ask key:
18 rumors
19 the food
1A lodging
1B High King
1C assassin
1D spying
1E the orcs
1F the camp
20 the kingdom
21 Valwyn
22 the secret way
23 sneaking
24 the tunnel
25 Black Asp
26 the temple
27 Lyche
28 the crime
* Note - the first 3 are kind of special. "Rumors" is always there by default, and "the food" and "lodging" are sort of reserved for asking innkeepers. But yes, they're actually things you can put in your ask list. In fact, you can put items in your ask list too (or other things), which is how you're able to ask about "the axe" or "the holy water" when you buy them. You can also put these askable things in your inventory if you want, and carry "Valwyn" around, or other quirky things. Don't expect anything more interesting to happen with them, though.
5. Teleporting
Well, ok, not really. Your position on the map is actually stored in your SAVED.GAM file as well, although I haven't been able to figure out all the quirks just yet. Bytes 0x0019 (high) and 0x0018 (low) control your horizontal position on the map, and 0x001B (high) and 0x001A (low) control your vertial position. So you can set your position such that the next time you load your game, you start off somewhere other than an inn. And while this is handy, it's not quite the whole story. Several other bytes control other important things that I haven't figured out, like "What level of the building are you in?" and "Which building are you in?" So if you decide to modify your position without those other bytes correctly set, you can walk around and explore just fine, but you can't necessarily interact with buildings as normal. So you may not be able to walk up/down stairs, or enter/leave the way you'd normally expect to.
The high byte goes from 00 to 3F, while the low byte seems to only matter to the nearest 8 before it alters your position. So a low byte of 02 and 03 are apparently the same. Note that this is a different coordinate system than for items, apparently, where the low byte always matters from 00 to FF, but the high byte only ever goes from 00 to 07.
6. Ultra-Fast Healing
I can't take credit for this one, I found it on a website:
http://www.abby-cheat.com/html/Pc_cheats/Times_of_Lore_cheat.html
But since I generally hate the advertising nature of game sites, I'll repeat it again here. You can modify the game engine so that your recovery time is nearly instant. In other words, for each 'clock tick' (or something similar), you're healing 1 point. This makes it very difficult to die, if not impossible. I haven't managed to die using this cheat, even after triggering supposedly automatic deaths. Within the LORE.EXE file, set bytes:
07BB: From: 00 To: C9
07BC: From: 75 To: 80
07BD: From: 03 To: 16
07BE: From: E8 To: 58
07BF: From: 65 To: 2D
07C0: From: 32 To: 00
7. "Unlimited Life"
Again, I can't take credit on this one, and what's more, I haven't even tried it out. The ultra-fast healing was good enough for me, so I stuck with that. I note that two of the bytes here are the SAME BYTES as the previous cheat, so I'm also not sure if they work in conjunction. But anyway, in your LORE.EXE file, set:
07B7: From: 80 To: C6
07B8: From: 3E To: 06
07BB: From: 00 To: 80
07BC: From: 75 To: EB
8. Items on the ground
The SAVED.GAM file also controls where items are located on the map. There's a grand total of 24 items in the game, which each have at least 6 bytes that dictate their position-- probably 8. Bytes 0x006C-0x009B control the horizontal position in byte pairs (low then high bytes). Bytes 0x009C-0x00CB control the vertical position in similar byte pairs. I suspect that bytes 0x00CC-0x00FB are related to the item locations, but I haven't yet figured out how. 0x00FC-0x0113 are a mystery to me, but they do control item locations, and something to do with which building or level of building the items are located on. 0x0114-0x012B controls the levels of the buildings more directly. The values are seemingly always 00, 01, or 02, but the floor that this corresponds to changes depending on the previous array of bytes somehow.
If you can figure this out and tell me how it's done, I'd sleep better at night.
9. Score
The score is pretty useless, but if you'd like to change it, it's located at 0x015E-0x0161 (low-to-high, as elsewhere).